Document Type
To access document types, go to Documents > Configure > Document Types, as shown in the following image:

Clicking on Document Types will display the list of all document types already registered in the system:

Alongside each registered document type, it has the date on which it was created, it also shows through icons the settings that the type of document has, such as:
| Icon | Meaning |
|---|---|
 | Indicates that it has an expiration date set. |
 | Indicates that it has versioning configured. |
 | Indicates that it has an approval process configured. |
Attention
Icons will only be displayed if you have one of the functions configured, otherwise only the creation date will be displayed.
Each document type has a menu of actions, among the possible actions on a document type are:
Document Type Options

- Select All: Select this option so that all document types are selected and batch deletion can be done.
- Edit: Select to edit the document type.
Attention
You cannot edit Abbreviaton, Code, and Document Type Model fields.
- Remove: Select to remove the document type.
Attention
It is not possible to delete document types that have published documents.
- Analyze Dependencies: Select to view where the Document Type relates within the platform. When you select this option, the following window will be available:

- Import Documents: Select to upload a large volume of documents and their metadata to Fusion Platform, so that you do not need to perform the publication of each of the documents to the system invidually.
Import Documents
This feature allows you to upload a large number of documents without having to publish each one individually. In addition, it will only be available to users who are administrators of the Documents module and also have the appropriate permissions on the Document Type in question.
This importation cannot be performed in batch, with several different Document Types, so if more than one Type is selected, the option will appear disabled.

Note
In the Timeline of the archive, no new specific events will be created to indicate the publishing/editing of documents through the import.
In this case, these actions will be recorded in the Document Timeline and in the Audit Center, following the pattern that already exists today.

File Structure
The importer will accept Excel (.xsl or .xlsx) files and each import file must refer to only a single Document Type in Fusion.
This excel file must be set up in the correct structure for the import to work correctly. Therefore, each column will correspond to a document import parameter or a form field of the Document Type and each row will be a document to be imported.

Thus, the first line must contain the codes of the fields configured in the Document Type to be imported or the field path in the case of E-form fields.
Furthermore, there are some additional parameters to be entered in addition to the form fields of the Document Type itself.
These parameters, and also the expected import behavior according to their completion, are specified below.
Attention
Please note that when the imported information is not consistent with the accepted values, whether this information is from the document or from its form, an error will be generated and the import of the document in question will be discarded to avoid publishing incorrect information.
Below are specified all the additional parameters that must be informed.
Local: folder
Este parâmetro informará ao Fusion o caminho do diretório em que o documento será criado na Central de Documentos ou a pasta para onde o mesmo será movido no caso de uma atualização, assim migrando o documento para a nova pasta.

This way, filling in the field will be mandatory for importing new documents, generating an error if it is not informed, and optional for existing documents. If left blank when updating, the location of the document will not change and it will remain in its current folder.
This path should inform the complete folder structure from the root, with the / separator between each one and also starting with the same / separator.
For example, to publish a document in the selected directory, the location entered should be:
"Commercial/Proposals/2022"
Another important point is that the folder in question must be configured to allow that Document Type. The publishing user needs the permission to create/edit that Type (and the document if it is already published) and the folders involved in the operation.

Document Code: code
This parameter will accept any type of value, numeric or text, even if it is formatted differently from the default document code and as long as it does not exceed the character limit of the field.

When this field does not have any value in the spreadsheet, the system will automatically generate the code according to the default value, so filling in this field is not mandatory.
When you enter values for codes that already exist in the system for the same Document Type, there are two possible behaviors:
The first is that if the setting to update documents is activated, it will overwrite the information of the documents by the ones that were informed in the spreadsheet, being able to generate a new version or keep the current one, this will depend on the Type settings.
And the other alternative is that if the setting to update documents is not activated, the current row will be discarded and the document will be kept as it is.
| Import Configuration | Value entered in code field | Expected import result |
|---|---|---|
| No update | Empty | Import the document and the system generates the code |
| Update | Empty | Import document and the system generates the code |
| No update | Existing Code | Deletes the row and does not update the document in question |
| Update | Existing Code | Updates the existing document information |
| No Update | New Code | Import the document with the given code |
| Update | New Code | Import the document with the given code |
Expiration Date: expirationDate
If the Document Type is set with expiration and this date can be edited on publication, this parameter can be edited and will accept dates according to the mask XX/XX/XXXX - XX:XX.

If this field is not populated, Fusion will automatically generate the date as per the Type default if expiration is/is enabled.
If this field is not with the editable option enabled but is still present in the import spreadsheet structure, the values in this column will still be imported into the bank, but will be ignored by Fusion so that the Type setting is respected and the default expiration time is maintained.
Tags: tag
Inserting tags is optional and applies both when editing documents and when publishing them. Each tag must be separated by the ";" divider and must respect Fusion's 255-character limit.

If the tag exceeds this limit, the document of the line with the inconsistency will not be imported with the character limit error reached.
Subjects: subjects
The subjects set in the Document Type are mandatory and cannot be removed when publishing or editing. Therefore, this parameter refers only to additional Subjects included beyond the default of the Type.

Also, subjects must be separated by the character ";" and must already exist in Fusion in order to be added to a document.
Attention
You will not be able to create new Subjects from the import, as is already the case in standard document publishing.
If the Subject informed is non-existent in Fusion, the document of the line with the inconsistency will not be imported, generating a screen error.
Version: version
This parameter is only applicable in case of Document Types with versioning and must follow the pattern configured in the Type, considering the numeric or alphabetic format and the revision levels defined.
If the value entered does not match the Type default, the document in the row with this inconsistency will not be imported.
New documents published by the importer do not need this value filled in, because the system will create them based on the initial version set in the Type. However, it will still be possible for them to be created in a version different from the initial version if this value is changed in the spreadsheet.
When updating documents via import, this information is mandatory for version control to be done correctly. This way, it will be possible to edit this value to any other version/revision than the current version in the system.
In addition, it will also be possible to perform several updates on the same document, such as versions 1, 2, and 2.1 in a single import, as long as all versions are entered correctly in each row of the Excel sheet.
Attention
Also, if the document type is not versioned but this field is still present in the structure of the import sheet, it will be discarded due to the structural error and no document will be imported.
Other parameters
The Author, IP Address and Date of publications/editions information will be automatically reported by Fusion, based on the user who is performing the import.
Documents published through the Document Importer will inherit the default permissions of the Document Type and folder where it is located, as documents updated on import will keep the permission settings already configured on it.
Regarding the validation of mandatory fields of the Document Type form, only mandatory fields of system e-forms will be validated, in addition to the mandatory parameters mentioned above.
Document type fields
The form fields of the Type will follow the masks configured in the system and when the imported information does not match the accepted values, an error will be generated and the entire document line will be discarded. Therefore, the accepted values for each type of field will be presented.
Text type fields
| Type | Rule |
|---|---|
| Default | Any type of text as long as it does not exceed the character limit |
| Password Mask | Imports as long as it does not exceed the character limit |
| Custom Mask | Values that exactly match the configuration of the custom mask, including characters. |
| Phone Mask +55 (00) 0000-0000 | (00) 0000-0000 or 52348162231 |
| Zip Code 00000-000 | 96040-720 or 96040720 |
Important
Fields marked as translatable will work correctly as long as the term is registered.
If the value entered in the spreadsheet exceeds the character limit, an error will be generated and the document line will be discarded.
Boolean type fields (Yes/No)
| Value | Rule |
|---|---|
| Yes | true, yes or 1 |
| No | false, no or 0 |
Integer Number type fields
| Type | Rule |
|---|---|
| Default 1.234 | 1.234 or 1234 |
| Mask without thousand separator 1234 | 1.234 or 1234 |
| Mask Percent 1234% | 1234% or 1234 |
| Customized Mask | Valores que atendam exatamente a configuração da máscara personalizada, incluindo caractes. |
| Telephone Mask +55 (00) 0000-0000 | (00) 0000-0000 ou 52348162231 |
| Zip Mask 00000-000 | 96040-720 ou 96040720 |
Important
If the value entered in the sheet exceeds the character limit, an error will be generated and the document line will be discarded.
The separators (comma and period) follow the language configuration of the system environment and not of the user. Therefore, when the language is English, the separator will be a comma instead of a period.
Using a thousand plus one decimal separator (for example: 10,000.43) will cause an error.
Decimal Number type fields
| Type | Rule |
|---|---|
| Standard 1,234.10 | 1,234.10 or 1234.10 or 1234 |
| Mask without thousand separator 1234.10 | 1,234.10 or 1234.10 or 1234 |
| Mask Percentage 1234.10% | 1234.10% or 1234.10 or 1234.10 or 1234 |
| Monetary Mask Prefix R$1,000.00 | 1,000.00 or 1000.00 or 1000 |
| Monetary Mask Suffix 1,000.00 $ | 1,000.00 or 1000.00 or 1000 |
| 1 Decimal Place 0.0 | 1.0 or 1.0 or 1 |
| 2 Decimal Places 0.00 | 1.00 or 1.00 or 1 |
| 3 Decimal Places 0.000 | 1.000 or 1.000 or 1 |
| 4 Decimal Places 0.0000 | 1.0000 or 1.0000 or 1 |
| 5 Decimal Places 0.00000 | 1.00000 or 1.00000 or 1 |
| 6 Decimal Places 0.000000 | 1.000000 or 1.000000 or 1 |
Important
The separators (comma and period), follow the language configuration of the system environment and not of the user, this way, when the language is English, the separator will be a comma instead of a period.
Using a thousand separator plus a decimal separator (for example: 10,000.43), will cause an error.
Date type fields
| Type | Rule |
|---|---|
| Mask 03/15/2018 | 05/15/2018 |
| Mask 03/15/18 | 03/15/18 |
| Mask 03/15 | 03/15 |
| Mask 15/03/2018 - 16:34 | 15/03/2018 - 16:34 |
| Mask 15/03/2018 - 16:34:59 | 15/03/2018 - 16:34:59 |
Important
The Business Days option will allow the import of dates that are not business days, even if this setting is active.
Excel will not allow dates younger than 1900 to be used, due to the calendar's default start date. In this case, if it is necessary to search for a date before 1900, it is possible to configure this date cell in Excel as a text cell, so the import will occur correctly.
Attention
The date field follows the language setting of the system environment and not of the user, so when the language is English, instead of being "day/month/year - 00:00", it will be "month/day/year - 00:00 AM/PM".
Time type fields
| Type | Rule |
|---|---|
| Mask 16:34 | 16:34 |
| Mask 16:34:53 | 13:34:59 |
Important
The time field follows the language setting of the system environment and not of the user, so when the language is English, instead of being "00:00", it will be "00:00 AM/PM".
File type fields
*Path: The file can be on the server or on the network, as long as it is visible to the Fusion Plarform server.
- C:\temp/file.xml (example of path in windows server environment)
- /opt/fileName (example of path in linux server environment)
Important
If the file exceeds the maximum size of the field, an error will be generated. This size refers to the field limit set in the Document Type management when creating/editing a Type. When creating these fields, the system defaults to a 2mb limit, but this can be changed up to 500mb.
Attention
Cloud environments do not have access to file directories, so it is not possible to import files. At this point, importing is only allowed from directories that the server has access to.
Also, the file signature requirement, if configured, will not be validated at this point by importing documents.
List of Options type fields
Will accept either the option name or the option position number.
For example: "1. Apple", "2. Grape": Will accept the value 1 (position) or Apple (option name).
Important
The system will first look if the value entered in the spreadsheet is compatible with the position, if it is compatible, it will consider the option found. If it is not compatible, the system will search if the value entered is compatible with the option name. This application is necessary because the position and the name may contain numeric values and cause conflict.
E-form type fields
The User Type and Consensus Type fields have the same definition as the E-form field. :::
In the E-form Type field, the path should be used as the reference of the field present in the related form on the first worksheet.
For example: usuario1.name
- usuario1: Field code of the main form, of Type User.
- name: Code of the "user name" field, in the NeoUser e-form.
The fields of Type E-form can be configured as selectable and non-selectable, and can also be configured as list.
Selectable Fields: Field type to link existing data in the related form. It will use the key fields to fetch the respective values from the system.
Important
Key fields must be indicated in the first line of the sheet, represented by an "*" (asterisk) next to the field code, and in the case of field paths, the asterisk must go at the end (for example: usuario1.name).
If no E-form field is set as unique value, the key is not required, so new records will always be created and not updated, because it does not have a parameter key field. On the other hand, if a key is set, updating will occur normally.
However, if any field in the spreadsheet is a unique value, you must enter it as a key, otherwise a structural error will be generated that will prevent all documents from being imported.
Selectable Field
| Import Configuration | Entered Code | Expected Import Result |
|---|---|---|
| Creation and Update Disabled | Existing on Fusion Platform | Link existing records and do not create new records |
| Creation and Update Disabled | New | Import with blank e-form field |
| Creation activated | Existing on Fusion Platform | Link existing records and do not edit records |
| Creation activated | New | Import and create new records |
| Updating activated | Existing on Fusion Platform | Links and updates existing records |
| Updating enabled | New | Import with blank e-form field |
| Creation and Update activated | Existing on Fusion Platform | Links and updates existing records |
| Creation and Update activated | New | Import and create new records |
Attention
In cases where an External Form is linked to an E-Form, even with the Creation and Update settings active, the behavior of the disabled settings will be maintained, since the creation or editing of External Form data will not be supported via import.
Non-Selectable Field: Field type to create new data in the related form. The fields will follow the formatting and rules already presented and records will always be created without the need for a key field or to activate the advanced settings intended for fields of the selectable type.
List Field: The list field follows the same behavior as the selectable and non-selectable fields, but using the "|" separator to separate the values that correspond to the list. In advanced cases that may have a list inside another, the separator ";" is also used.
For example: "Joinville|Curitiba" or "Joinville|Curitiba;Blumenau|Brusque" (List within a list).
Import Documents
Step Setup
In this step, you will need to select the Excel file (.xls or .xlsx) that has been configured with the information for import.

When choosing the file, if the file extension is not one of the two previously mentioned, it will not allow adding the file, or if it is incorrectly configured, Fusion will inform you that there was an error loading the file and you will have to try again.

After inserting the correct file and the upload is successful, a few on-screen options will become available regarding the import settings:

Update Documents
By activating this option, documents that have existing code in the system will be edited with the imported information and their metadata will be updated. If the option is disabled, the documents will not be updated.
Attention
If this option is disabled, all rows with already existing documents (based on Document Type and its code) will be discarded, but will not generate information in the summary step.
If update is selected, it will update the metadata of the documents in question, as long as the document is not being edited, approved, inactive, or in a user's trash. The only exception is with the selectable fields that need to have the option "Update records of related forms" enabled.
Also note that all documents will be updated, so the lines that have a blank value in the spreadsheet will be included in the database with a blank value.
Create Records on Related Forms
When you enable this option, records whose defined key fields do not exist in the related forms will be created from the imported data. If the option is disabled, the imported records will be discarded.
Caution
This setting refers to e-forms fields configured as selectable, so if this option is disabled and there are key fields that do not exist in the system, the entire row of records referring to the related form is discarded.
If creation is selected, but the row does not have all the record information, it will be created normally, even without key or required information.
In cases of system information, such as user, group and role, if the sheet does not have the Fusion code column, the record cannot be created.
Update Records on Related Forms
When you enable this option, records whose defined key fields already exist in the related forms will be replaced by the imported information. If the option is disabled, the records will only be linked.
This setting refers to E-forms fields configured as selectable, therefore, if this option is disabled, the entire row of records referring to the form related to the e-form field will be discarded.
If update is selected, all records that are blank in the spreadsheet will be included in the database with the blank value. :::
Create Non-Existing Folders:
By activating this option, the folders entered in the folder field that do not yet exist in the system will be created inheriting the permissions of the upper folder. If the option is disabled, the documents will not be imported.
Attention
If no parent folder already existing in the system is found, the complete structure is created in the root, with permissions for the role All Users.
For folder creation, the importing user must also have the appropriate permissions for the creation to take place. If he does not have such permissions, an error will be generated.
Ignore Process Triggers: When this option is enabled, all process triggers initiated with the publication of documents will not be triggered by the import. If the option is disabled, the processes will be started normally.
After enabling the options according to your needs, just click on "Next", located on the lower right corner of the screen.
Confirmation Step
If the file has no structural errors, it will proceed to the Confirmation step.

On screen will appear the amount of documents that will be imported along with a message informing about the file that will be imported and also that it is important to make sure you do not import incorrect, outdated information or missing required fields, as this can generate inconsistencies in the documents and related forms.
Another important point is that, once advanced, it will not be possible to reverse this action.
Attention
Please note that if the Document Type in question has triggers to start processes at the moment of its publication and these have not been disabled in the Configuration Step, the process of importing these documents may be slow.
You must agree and subsequently select "Next" in the bottom right corner to continue.
Summary Step
This step brings final information about the import. If any error is found, it will be specified in this step. Remember that when the error is identified already in the Configuration Step, the user is directly forwarded to the Summary Step, which will detail the problem in question.
In addition, three possible error scenarios may occur and they are:
Exceed Record Limit
If the user uploads a file containing more than 50,000 lines of records, which is the maximum amount supported by the importer, Fusion will inform on screen as shown on the image below:

File without information
In case the user uploads a file without any information/totally blank, Fusion will inform on screen as per the image below:

File with incorrect information
In case the user performs the configuration of Excel columns out of the standards already explained above, they will be considered impeditive errors for the import and Fusion will inform on screen as per the image below:

The structural errors will be listed and could be four different types:
| Error Type | Message |
|---|---|
| Column (field code) entered in Excel does not exist in Fusion. | The {0} field was not found in the system. |
| E-forms of the Sealable Type that have fields set as unique value and no key in the submitted file. Remember that key fields are identified by an * (asterisk) next to the code. | The unique field {0} is not marked as key. |
| When more than one column with the same code is informed. | The field {0} is duplicated in the sent file. |
When field codes of unmapped processes or E-form Document Type fields are informed (except List = No and Selectable = Yes). | The {0} field cannot be imported.
Also in the Summary Step, if Excel has been correctly configured, Fusion will inform you on screen as shown below:

It is also possible that the import was successful, however, some specific errors may have occurred. In these cases, Fusion will also inform you on screen, as shown in the image below:

Below are some other errors that can cause a file import to fail:
| Field | Error Type | Message |
|---|---|---|
| All field types | Incorrect Mask / Unsupported value | The value of the {0} field does not match the {0} field type or mask. |
| Tags, Text, Integer and Decimal Number | Character limit reached | The value of the field {0} has exceeded the limit of {0} characters. |
| File | File not found/Value not supported | The value of the {0} field was not found or does not match the File field type. |
| File | Maximum limit reached | The file of the {0} field has exceeded the maximum size {0}. |
| E-form and document parameters | Required information | The value of the required field {0} has not been entered. |
| E-form | Key fields yielding more than one result | Simple Key: The key entered in field {0} has more than one record and must be a value |
| E-form | Key fields bringing more than one result | Composite Key: The key entered in fields {0}, {0} and {0} have more than one record and these must be unique values. |
| Generic | Field with unique value setting | The value of the {0} field already exists in the system and it needs to be a unique value. |
| Document Status | Document is being edited, approved, inactive or in the trash can of some user | The status of this document does not allow editing. |
| Document Code | Code already exists in Fusion in duplicate | The code from this document already exists in the system in the folders {local} and {local} |
| Document Version | Document version higher than the version informed | Document is already in a version higher than the one informed. |
| Permissions | Insufficient permissions to perform the action | You do not have the necessary permissions to relaunch the import. |
| Publication Place | Informed Folder(s) does not exist in the system | Informed folder path does not exist in the system. |
Searching Document Types
To perform a search between document types, enter the search in the Search document types field, to perform your search click the magnifying glass or press Enter.

To undo a search, click on the x next to the search field:

Ordering Document Types
Document types can be ordered, below the search field are the ordering options:

- Name: Select for document types to be ordered by Name.
- Creation date: Select for document types to be ordered by Creation Date.
- Ascending: Select to order from A to Z.
- Descending: Select to order from Z to A.
New Document Type
To register a new document type, click New Document Type in the upper right corner:

General Stage
Then the following image will appear:

A - General: First it will be necessary to complete the general settings, when filling in the Name field, the Abbreviaton and Code fields will be filled in, as shown in the following image:

Note: Although the abbreviaton and code fields are autocomplete, they can be changed.
The Description field is not required, but if necessary, enter a description for the type of document being enrolled in the system.
Subsequently, it is necessary to select how the publication of documents with this type will be carried out:
- Manual: Publication of documents manually in the document center.
- System: Publication of documents by processes or integrations.
- Never: The type of document being created will only serve as a model, in a model type fields can be created that will be reused in other types.
And to finish the first stage, select the document type that will serve as a model, by default it is already pre-selected Default Document Type, however, the user can change.
Attention: When selecting a document type as a model, in the publishing stage fields that have the same code (both in the template and in the type of document that was created) will appear only once. In this case, only the fields present in the type of document being created will remain visible.
Attention: Document types that are registered with the publishing option will never appear in the model document type selection.
When finalizing the settings in the General tab, select Next.
Fields Stage
B - Fields: During the configuration of a document type it is possible to add new fields, to perform this configuration, in the document type go to the Fields stage and in this stage register and configure fields that will be displayed in the document, by default there are already three fields registered in the document type, they are: Code, Title and File.

To register a new field, click New Field. The following image will appear:

Then it will be available to fill in the new field:

The document type field settings are the same as for form fields.
Note
When selecting the default form for Document (NeoDocument) in Fusion to reference in an E-form field of a Dynamic Form, the File field - a standard field in Document Types - will not be displayed in the list of Available Fields to be selected in process activities. In other words, it will not be possible to select the File field in any process activity in this scenario.
It's important to note that when referencing a specific Document Type, the File field will continue to be displayed as usual.
Settings Stage
C — Settings: You can add settings regarding Approval, Versioning, Expiration, and other details about the document type:

Note: To add settings that reference fields added to the fields tab, you must first advance to the Social tab to save the document type. Then edit the document type and proceed to the configuration tab so that you can make the settings.
When you go to the last tab and click Finish, the registration confirmation alert for a new document type will appear.

This alert warns that the system will be unavailable for a few moments because the system structures will be updated. In addition to informing how many users are online and will have their sessions blocked for these moments, but this does not cause any harmful consequences, they will be able to continue their activities normally at the end of this update.
Return to the document types screen and in the desired document menu click edit:

Setting Up Approval
Fusion allows you to set up documents to pass approval. With this, the document must first be approved and then released to other users. The approval option is available when creating the Document Type. Once a new document is created and released, it will go directly for approval.
To set up approval, in the Approval session click on the phrase “Not to have approval” and select the phrase “To have release approval”:

When you select the phrase “To have release approval”, fields will appear to set up approval for the document being created. Where consensus is written, it is necessary to click to select whether the document will be approved by Consensus, Competency or Competency with Consensus

Select Consensus so that if there is more than one approver, everyone can approve the document in parallel. That is, all approvers will receive approval activities as soon as the document is submitted for review. The decision is democratic, each approver involved will participate. When you select this option, the Approvers field appears.
When you select this option, a value must be filled in together with the users or percent option to configure consensus:

These options shown in the previous image are for selecting whether the consensus will be Percentage to set the minimum percentage for the document to be approved or if it will be by User to define the amount of approvals that the document must have in order for it to be approved.
After entering the value it is necessary to configure the approvers, when you click on the Select option you have two options, these are:

- Listed by me: Select this option if you want to pre-configure in the document type the fixed users who will be the approvers.
- By form field: Select this option to configure the form fields that will receive document approving users.
Attention: To select approving users by form field, you must have registered a user-type field or an e-form field that is selectable.
Select the Listed by Me option then it will expand another field to select document approvers, as shown in the following image:

After selecting the approvers will display the option to select whether the user wants to, upon reaching consensus, to not wait for the completion of all tasks to advance the process, or if the user wishes to wait regardless of the result:

Select the By Form Field option then it will expand another field to select the user type field:

After making the settings according to your need, click Save and the document type will be updated with approval settings.
Note: When you select the “By Form Field” option, the options that will be displayed in the “Approvers” setting will be directly related to the selected field type.
For example, if the selected form field is an E-form pointing to groups, only groups are displayed to be selected as approvers.
Note: When setting up for document type approval, filling in the approvers is mandatory, regardless of whether they are listed or by form field.
Attention: In order for approval to occur, after setting it up, a trigger must be set up by accessing Optional and setting the information in the Start Process item.
Setting Up Competency
In Competency, approval tasks are generated according to the sequence of users entered. Select this option to release approval to the first user entered in the Approvers list. The decision is hierarchical and limited. If the user approves the document, the second user on the list can also approve. If the first user in the list fails the document, the second user will not fire. Selecting this option displays the field for selecting approvers listed by the user or by form field.
Attention: To select approving users by form field, you must have registered a user-type field or an e-form field that is selectable, and this must be called in the document type.
Setting Up Competency with Consensus
In Competency with Consensus, approval tasks are also generated according to the sequence of users, roles or groups informed, in which case approval is sent to all users, role users, or users of the group, generating a consensus among the results, if approved, it will go to the next user, role, or group of responsibility, if disapproved, the second will not be triggered.
When selecting this option, a value must be filled in together with the users or percent option to configure the competency with consensus:

Attention: For consensus that consider roles and/or groups that do not have the same number of users, it is recommended to use the percentage setting to define the number of approvals that the document must have in each competency to be approved.
These options shown in the previous image are to select whether the consensus will be by Percentage to set the minimum percentage for the document to be approved, or whether it will be by number of users to define the amount of approvals that the document must have in order for it to be approved.
After entering the value it is necessary to configure the approvers, when you click on the Select option you have two options, these are:

- Listed by me: Select this option if you want to pre-configure in the document type the fixed users/role/groups that will be the approvers.
- By form field: Select this option to configure the form fields that will receive the document's approver users/role/groups.
Attention: To select approving users by form field, you must have registered a user-type field or an e-form field that is selectable, and this must be called in the document type.
Select the Listed by Me option then it will expand another field to select document approvers, as shown in the following image:

Select the By Form Field option then it will expand another field to select the user type field:

After making the settings according to your need, click Save and the document type will be updated with approval settings.
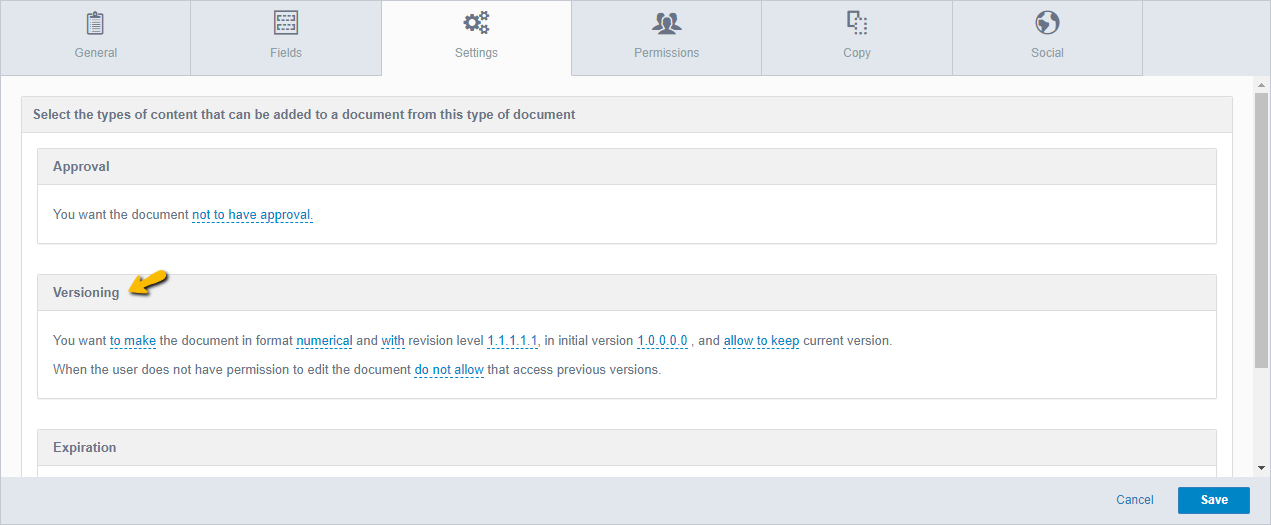
Setting Up Versioning
For each modification of a document to be saved, making it possible to access old data, Fusion makes it possible to create document versions. With versioning, in addition to the current version of the document, all your modifications can be accessed in a history. To create versioned documents, on the document type creation screen in the Settings stage, click the To not make option and select the To make option. Selecting will display other versioning configuration options as shown in the following image:

When enabling versioning within a Document Type, you will need to indicate whether the document will be in numerical or alphabetical format.

Attention
When the versioning pattern is changed, already published documents will be kept. Thus, only new published documents will be in the new defined versioning pattern.
Inform whether the versioning will be with or without revision level, to do so click on the option with and select the desired option as shown in the following image:

With the without revision level option selected, you can tell what the initial version will be:

If you choose to change versioning to alphabetical format, the initial version also changes from 1 to A.

Attention
As long as the versioning is numerical, only natural numbers are allowed. For alphabetical versioning, only Latin alphabet letters and the numeral 0 are allowed.
Letters entered in this field will be automatically formatted to their uppercase version and limited to 4 characters.
When a Document Type has alphabetical versioning enabled, new versions will be identified by the letters of the alphabet, considering the structure below:
| Alphabetic | Numeric |
|---|---|
| 0 | 0 |
| A | 1 |
| B | 2 |
| C | 3 |
| D | 4 |
| E | 5 |
| F | 6 |
| G | 7 |
| H | 8 |
| I | 9 |
| J | 10 |
| K | 11 |
| L | 12 |
| M | 13 |
| N | 14 |
| O | 15 |
| P | 16 |
| Q | 17 |
| R | 18 |
| S | 19 |
| T | 20 |
| U | 21 |
| V | 22 |
| W | 23 |
| X | 24 |
| Y | 25 |
| Z | 26 |
When reaching version Z = 26, a new character is added to the sequence and restarted at the letter A. Therefore, the new version will be AA = 27, AB = 28 and so on.
With the with revision level option selected, you can also configure which revision level you want for the document, in which case click on option 1.1.1.1.1 which is the option that is selected by default and change to the option you want:

Afterwards, it is necessary to tell which number will start the initial version:

In the penultimate versioning configuration stage, the user must select whether or not to allow to maintain current version, while allowing to maintain version it is possible to change a document and maintain the same version number as the current version. Select Allow to keep so that the document can be modified and still maintain the same version. By selecting Do not allow to keep, whenever a document is modified, a new version should be created. As the picture below:

The last setup stage is about whether a user will be allowed to access previous versions of the document, even if they don't have edit permission:

After making the settings according to your need, click Save and the document type will be updated with the versioning settings.
Setting Up Expiration
The expiration of documents allows you to create deadlines for documents in EDM. With this, after a certain time, the document expires, and is no longer available to users. On the New Document Type screen, go to the Settings stage and in the Expiration session click To not expire which is the option that is selected by default, clicking will display two options as shown in the following image:

Selecting the To expire option will release more options for setting the document expiration.

Some fields are mandatory and others are only informative. These will be described below your fill forms.
Enter the value: In this grouper it is possible to define the lifetime of the document, that is, the time it will have until its expiration. In it, the fields for placing a Value and another for defining the Time Unit for that value are displayed. Example: minutes, hours, days, week, month, year, as shown in the following image:

After stipulating a deadline for the document to expire, it is necessary to configure whether to notify in advance of the document expiration, to do so click on the Do Not Notify option that is selected by default and click on Will Notify option, when selected this option will issue document expiration notifications . Selected Do Not Notify, warnings will not be issued:

With the Will Notify option selected will enable a field to configure how long in advance users should be notified:

After setting the advance time that will notify when the document has expired, it is necessary to configure which users will be notified, for that it is necessary to click on the Select option and enter the desired users, as shown in the following screen:

In the latter configuration, by default the option to allow the expiration date to be changed during the publishing/editing of a document is enabled, but if necessary it is possible to change it so that it is not allowed. To do this, click Allow and select the Do not allow option, as shown in the following image:

After making the settings according to your need, click Save and the document type will be updated with the expiration settings.
Also in the Settings tab are the Optional settings:

Note
When in the Fields tab there is a field of type “File” configured with the Electronic Signature option or an “E-form” field with a field with the aforementioned configuration, in the Optional Settings it will be possible to configure Electronic Signature details in this type of document.
Document Type related to the Start of a Process
The settings for starting processes from documents are used to integrate EDM with Workflow. With them, it is possible to configure processes to start on certain actions in the document. On the document type creation screen, you can configure a process to start as soon as there is a certain action in the document. The following screen displays the option:

To perform the setup to start a process, first select the Before option if it is an approval process and the After option for processes that will start parallel to perform actions:

Now click select the action and select what should occur to start a process.
• If the option before is selected:

Select Inactivate Document to initiate an approval process when a user requests to inactivate a document.
Select Remove Document to initiate an approval process when a user requests deletion of a document.
Select Publish Document to initiate an approval process when a user publishes a document.
When setting the option before a certain action it starts a process, the document is only released after completion of the process, which must be selected in the field in the image below:

Attention This process must be approved as it will lock the document and only after approval will the document be released again.
Now it is necessary to configure the field that will receive the current version of the document, click the Select option and select the e-form type field that points to the document type created that contains the active version of the document field and that will be approved in the process. This field is mandatory.
After selecting the field that will receive the active version of the document will release the field so that the new version of the document is selected, select the e-form field that points to the document type created that contains the new version of the document field and which will be approved in the process. This field is mandatory.
Then it will release the field for the approvers to be set up, the first option is to select a form field that will receive the approvers, for example, it is possible that a field that receives the approvers is set up so that the process can be reusable in various sectors of the company, so select the field that will receive the approvers and then select which document approvers will be for that document type.
Attention
The field that will receive approvers must be of the User type or be an e-form field that relates to the NeoUser form.
For better understanding, for example: selecting before inactivating document, when a user requests the inactivation of a document in EDM, the document is stuck and a process starts. Only when the document inactivation process completes will it be inactivated.
- If the option after is selected, the actions shown in the image below for selection will appear:

The options to start process after a certain action do not make any modifications to the document. For example: selecting which will start the process after publishing the document, a process will start when a document is published. However, the process will not interfere with EDM.
When actions such as publishing, moving, expiring, inactivating, or removing a document are performed, a process starts in parallel.
Select Publish Document to start a process when a document is published. That is, as soon as the user creates a document and clicks Publish, the document is released to users and later a process is started.
Select Move document so that a process starts as soon as a document is moved. That is, as soon as a user edits a document, clicks the Actions arrow > Move , and selects the desired folder, the document is moved from folder and later a process starts.
Select Expire document to start a process as soon as a document is expired. That is, once a document expires, the system no longer makes the document available to users and subsequently starts a process.
Select Inactivate document to start a process when a document is inactivated. That is, once a user, in the document navigation, clicks the Actions arrow > Inactivate. After completing the reason and confirming the inactivation, the document is inactivated and a process is subsequently initiated.
Select Remove Document to initiate a process when a document is removed. That is, as soon as a user, in the document navigation, clicks the Actions arrow > Remove and confirms the removal, the document is removed and a process is subsequently started.
Selecting any of the above actions will display the fields below, as shown in the following image:

Some fields are mandatory and others are only informative. These will be described below your fill forms.
Process: Click the Select field that appears after the action is selected and select the process that will start in parallel with the action. Process selection is mandatory.

Current Version: Select the e-form field that points to the system form 'Document' that contains the current version of the document and which will be approved in the process. This field is not mandatory, that is, you can select the None option if this field does not exist in the selected process:

New Version: Select the e-form field that points to the form of the 'Document' system that will store the document in its new version:

Note
You can delete Start Process settings, to delete click the trash can icon next to the setting:

Also, to add start process settings, click (+):

When adding settings, the parameters will look like this:

After the start process settings are complete, click Save.
Electronic signature
When there is a File type field configured with the Electronic Signature option or an E-form field containing a field with the aforementioned configuration, in the Optional Settings it is possible to configure rules with details of the Electronic Signature, you can add as many rules as you deem necessary.
To remove any created rules, simply click on the trash can icon in the right-hand corner of the sentence.

Clicking on “select” will open a screen and it will be possible to select the fields of the Document Type form. On this screen, only E-form fields that can be expanded are displayed and are only for navigation allowing you to expand items or fields of type File that have an electronic signature configured.

It is important to note that when setting up a new rule, it is possible to select any field of type File, even fields from another rule already added, so this field will be linked only to the new rule and the system will ignore the previous rule that had that field. The rule that lost the selected field will remain on screen, since there is no validation in the configuration of sentences and this will not be persisted by the system. After saving the document type, the invalid phrases will be removed.
Attention
You will not be able to select File-type fields related to E-form fields set to Selectable Yes, and therefore they will not be displayed on the field selection screen.
Then define whether the publisher user can, be obliged or can't to sign the file. And then, if he can, be obliged or can't to add other signatories.

Attention
It will not be possible to select the can't option simultaneously in two different rules. If one of the rules already has this option, when configuring the other rules it will appear disabled.
After making the settings according to your need, click Save and the document type will be updated with the electronic signature settings.
Note that once the document type is saved and published, the settings will apply to all documents created from that type until the settings are changed. If the settings are changed, documents created prior to the changes will remain with the rules applied at the time of creation, so the new settings will only affect new documents.
Watermark
This functionality will allow the administrator user of the Documents module to activate and configure the watermark, its layout, color, positioning, and several other options.

By selecting the option from "don't show" to "show", other options will become available on the screen.

Note
It is worth noting that when this option is changed, all documents of this Type will be automatically updated to reflect the selected setting, regardless of whether they have already been published or not.
With watermarking enabled, some additional settings for customizations emerge.
First, you can define what text will be displayed in the watermark.

This field allows settings through formulas, it is a very similar behavior to the watermark in Copy Controlled.
If the field code entered has an empty value or does not exist, this parameter will also be displayed blank, because there will be no valid value to show.
By default, the watermark will show the full name of the user logged on in the current session, followed by the current full date. It will also be possible to use other fields linked to the User form, including E-form fields that use NeoUser as a template.
It is worth noting that this field has a 256-character limit, if an invalid value is entered in the field, it reverts to the default value.
Next, you can select the orientation of the text, which can be diagonal, horizontal, or vertical, depending on the selection.

In addition, you can also define whether the mark will be repeated throughout the pages of the file, or only displayed once centered on each page.

Note
It is important to note that changing the orientation to diagonal or vertical and/or applying the watermark with repetition may impact the loading time of the pages of this file on the screen, due to the rotations and application of information, and will influence the number of pages the file contains.
Another option available is to set the color of the watermark using the hexadecimal code and also the color selection component, displayed next to the text field.

Remember that the digitizable field of the color, only accepts the insertion of numbers and letters. If the entered value is invalid or empty, it will return to the default value #808080.
The option to set the watermark's opacity level in its display within files is also available.

By default the value is 40%, however, you can change it to any integer number between 0 and 100, where 0 is a completely transparent watermark.
Finally, it is possible to define whether the viewing of files configured with a watermark by FusionBOX will be allowed.

By default, this configuration will be set to the To Not Allow option, in which case these documents cannot be viewed through FusionBOX. When changing this option to To Allow, the feature to view documents via FusionBOX will be enabled.
Attention
It's important to note that watermarks are not compatible with FusionBOX. Even if the configuration allows viewing through FusionBOX, the watermark will not be displayed.
Attention
In cases where the Document Type has several different files to display, Fusion will use the same watermark pattern for all of them. Thus, it is up to the user to define the most appropriate configuration that meets all the files that use the same Type.
After configuring the watermark, it will be available as shown in the image below.

In this case, the watermark is on the diagonal, the text has only the name set, while the color and opacity are at default values.
Note
If the file has a Related Documents of a different Document Type without the watermark set/enabled, Fusion will recognize the different settings of each and will only display the watermark on the respective pages. It will even show the different settings of each watermark, if any.
Attention
Since the watermark is only applied on the default Fusion viewer (Universal Viewer), watermarking will not be contemplated on the PDF Viewer, the Fusion APP (Mobile) Viewer, the Electronic Signature mode viewer, files opened via FusionBOX or when downloading a document.
Attention
Remember that the application of the watermark is applied only on documents of the Documents module and not on files included as attachments inside processes.
However, inside a process it is possible to have an E-form field where a document's file can also be visualized. In that case, the watermark should still be displayed.
Setting Up Customization:
The Java Class serves to facilitate the insertion of a customization in your Document Type. You can create other scenarios as desired.

After the customization settings are complete, click Save.
Permissions Stage
D — Permissions: Permissions regarding documents can have up to three permission stages. The first is in document types, where there are broad permissions. When setting up a document type it is very important to set the permissions, in the permissions tab you should display the following screen:

The first stage will be to configure the Document Type Permissions, that is, to define who will have access to edit the type settings, by default it is defined that all users who have a EDM administrator profile can make changes to the document type, as shown in the following image:

To change this setting, click on the field where All GED administrators is selected, then it will display the list of users, select the users who should have access to edit the document type:

Attention: Only users who have EDM administrator profile will have access to editing the document type.
As many users, roles, or groups as needed can be entered. Once a user, role, or group is chosen, the All GED Administrators option will exit the settings:

Note: If users configured for document type management permissions are deleted from the field, then the All GED Administrators option will automatically return.
The next stage is to configure the users who will have access to publish documents with this type of document, by default the field is empty, that is, all users have permission to use this type of document, however, it is also possible to leave this field empty so that the permissions are inherited from the settings of folders or documents published with the type:

Clicking on the empty field will display a list of users so that the user can select the users, groups, and roles and configure specific permissions.

When you select one or more users/role/groups, the options will be displayed to set permissions for them, by default all options are marked as To allow, as shown in the following image:

Permissions on Visualize, Create, Edit, Remove, Generate controlled copy, Download, copy, and print actions can be allowed or denied.
By allowing an action, it means that the user/role/group can perform that action on the document type. By denying an action, it means that the user/role/group will not be able to perform that action on the type of document, or anything subsequent to the document type, such as publishing a document with that type.
Attention: By not checking the options to allow or deny, the system understands that at this point this action is being denied, but it can be modified later in something later than the document type. Because permissions are inherited in each configuration, in this case it respects the settings defined in the document type, then the folder settings and finally those set directly in the document.
When you select the Create, Edit, Remove, Generate controlled copy, and Download, copy, and print options, automatically the Visualize option is checked because the user must have access to preview before they can perform other actions on the document.
After setting the permissions, click Save and the document type will be saved and updated with the new settings.
Copy Stage
E — Copy: The controlled copy printing was created to control the documents being printed. To perform the controlled copy configuration it is necessary to access the type of document that will receive this configuration, in the Copy stage the available screen as shown in the following image:

By default, the controlled copy option is disabled for the user, so it is necessary to click Will allow and the option will be displayed so that the user can enable controlled copying, as shown in the following image:

Clicking the Will allow option will enable the settings for the controlled copy for filling:

First displays the default controlled copy settings (to learn more about controlled copy configuration in the system, go to System Settings., if the copy is required to be customized, click System Default and change to the Custom option, then the copy options became editable, as shown in the following image:

Now you need to select which type of copy the document type will allow, the copy types are:

- Controlled Copy: It has a control of use and distribution.
- Not Controlled Copy: It has no control over usage or distribution.
- Both: Both types of copy will be allowed.
To select the desired copy type and click on the chosen option, clicking Controlled will display as shown in the following image:

You can change the watermark that will be displayed in the document when generating controlled copy, to do so enter the text that you want to be entered in the copy and click outside the field, then the phrase will be updated. You can use tags as well as $ to select form fields and % for constants and fields from the controlled copy:

Note: You can get the expiration date of the copy and the expiration date of the document. To return this information, you must enter the following parameters:
- %copy.ExpirationDate (copy expiration date)
- $ExpirationDate (document expiration date)
Attention: When the copy type is selected with the Not Controlled option, it will not allow you to change the watermark field.
The watermark phrase will be displayed in the sample document below the settings, in all possible positions that will be configured later.
The next stage of configuring the custom copy is to select the format that will be accepted to generate the copy, the available ones are:

- Digital: PDF format copy for download.
- Printed: Copy in printed physical format.
- Both: Will accept copy in both available formats.
When generating a controlled copy of a document, you can generate a protocol, which is a cover page with general document information:

Finally, select where the watermark will be displayed, the system releases five options: Top, Base, Diagonal, Left or Right.
Click on top of the desired option in the document image so that it is configured. The chosen position will have the green icon next to it, as shown in the following image:

Then click Save and the document type will be saved with the copy settings.
Social Stage
F — Social: It is possible to relate subjects directly in the document type configuration, so that when a document is published, it automatically relates to the configured subject. This setting allows users who follow a certain subject to be notified of the publication or alteration of a document of interest to them. To learn more about Subjects, visit Subjects Management. When accessing the Social tab, the following image will be displayed:

Clicking on the Subjects field will display the list of subjects already registered in the system, then click on the desired subjects, as shown in the image below:

Select as many subjects as you want.
Attention: Subjects directly related to the document type cannot be removed during document publication.
After selecting the subjects, click Save to save the document type.