Security
The administration has tools that allow the management of the system. The settings can be people management or tool management. For management to be done with greater security control, only two types of users have access to the administration area: the General Administrator and the Local Administrator.
The administration allows users to manage, such as modifying their data, permissions, creation, inactivation, among others. However, the creation of roles and groups is necessary before a user can be created. Next we will look at the steps for creating roles, groups, users, in that order, and managing those users.
Role Settings
Roles are used to define responsible for activities in the modeling of workflows, as well as to apply security rules to users from different groups, grouping them under the same set.
To access the role screen go to: Administration > Security > Roles. When you open the role screen, it will be possible to see the role already registered according to the image below:

Creating a New Role
To add a new role, click New. If you want to register more than one role, click New (batch).

Clicking New opens the following screen:

The registration of a new role has mandatory fields and others only for information, these will be described below:
- Code: You must enter the code of the role you want to create.
- Name: It is mandatory to enter the role name.
- Users: Once the role information is filled in, it is possible to relate the users. It is important to mention that the relationship of users is not mandatory at the time of the creation of the role, that is, it is possible to create the role and relate the users as they are created.
Tip: On this screen, the procedure for relating users to the role can be done in two ways:
- Enter the user name in the field, then the available user options appear as shown in the image:

Select the desired user and click “Add”:

Then the user will be included in the list of users who have that role:

After completing the information, click “Ok” to effect the creation of the Role.
- Click Add:

It will open the list of registered users, simply choose the desired user (s), checking the options and then click on “Add”:

Click on the “x” to close the user listing window, and you can see the user (s) added to the role:

After completing the information, click “Ok” to effect the creation of the Role.
Viewing, Editing, and Deleting a Role
On the role screen, the roles already registered in Fusion are present. To visualize, click the magnifying glass icon next to the role you want to view, as shown in the image below:

Clicking on the magnifying glass to view opens the following screen:

In visualize, it is possible to view the information of each user and export the information about the users related to that role, to do so, simply select the desired users and click on export, which will download the file with the information of those users, as shown in the image below:

To edit the data of a Role, click on the editing pencil:

You can then edit name, add new users, delete users, view users, and export user information, as shown in the next image:

When you finish editing, just click “Ok” to save the changes, if you click “Apply” the changes will be made, however the editing screen remains open.
Deleting roles can be done in two ways:
- In batch, selecting more than one role and selecting the delete option, as shown in the next image:

- One role at a time by clicking the delete icon:

Attention: A role can only be deleted if there are no users included in it. If you have added users, it won't be deleted. To do this, the role must be edited in relation to the added users or it must be inactivated.
Searching and Exporting a Role
On the role screen, the roles already registered in Fusion are present. To search between roles, click on Search:

Then the following screen will appear:

With items for research:
- Type: Role will already be selected for search among registered roles.
- Code: Enter the role code as a search method.
- Name: Enter the role name as a search method.
- “Search with exactly the same values”: The search results for fractions of words, if you want the result to return only exact values as entered in one of the fields as a search method, then select this option.
Attention: Just fill in one of the type, code, name or asset fields so that the search can be performed. You don't have to fill in all fields.
To export roles, select the ones you want and click Export to Excel, the following screen will appear:

The options to export everything registered or only selected/Last filtered roles are available. Clicking Ok will download the file with information about the exported roles.
Group Settings
To group people from the same area or department of an organization in Fusion, you must create a new group. To access the groups screen go to: Administration > Security > Groups. When you open the groups screen, it will be possible to see the groups already registered according to the image below:

Creating a New Group
To add a new group, click New. If you want to register more than one group, click New (batch).

Clicking New opens the following screen:

The registration of a new group has mandatory fields and others only for information, these will be described below:
- Code: You must enter the code of the group you want to create.
- Name: It is mandatory to enter the group name.
- Abbreviaton: An abbreviaton for the group can be provided.
- Upper Level (Higher Level): The group created may be related to another group, stating that this is its superior.
- Responsible: Inform which role is responsible for the group.
- Users: Once the group information is filled in, you can list the users. It is important to mention that the relationship of users is not mandatory at the time of group creation, that is, you can create the group and relate users as they are created.
Tip: On this screen, the procedure for relating users to the group can be done in two ways:
- Enter the user name in the field, then the available user options appear as shown in the image:

Select the desired one and click “Add”:

Then the user will be included in the list of users belonging to that group:

Attention: To add users to groups through the New Group or Edit Group screen (in this case, they already have a group, since the group field is mandatory in the New User registration), then when a user is entered in the list, in the Group column the user's old group will appear. The group information will be updated as soon as the create/edit screen is saved.
After completing the information, click “Ok” to effect the creation of the Group.
- Click Add:

It will open the list of registered users, simply choose the desired user (s), checking the options and then click on “Add”:

Click on the “x” to close the user listing window, and you can see the user (s) added to the group:

After completing the information, click “Ok” to effect the creation of the Group.
Viewing, Editing, and Deleting a Group
The groups already registered in Fusion are present on the Groups screen. To visualize, click the magnifying glass icon next to the group you want to view, as shown in the image below:

Clicking on the magnifying glass to visualize opens the following screen:

In visualize, it is possible to view the information of each user and export the information about the users related to that group, to do so, simply select the desired users and click on export, which will download the file with the information of those users, as shown in the image below:

To edit a Group's data, click on the editing pencil:

You can then edit name, abbreviaton, upper level, responsible, add new users, delete users, visualize users, and export user information, as shown in the next image:

When you finish editing, just click “Ok” to save the changes, if you click “Apply” the changes will be made, however the editing screen remains open.
Deleting groups can be done in two ways:
- In batch, selecting more than one group and selecting the delete option, as shown in the following image:

- One group at a time by clicking the delete icon:

Note: A group can only be deleted if there are no users included in it. If you have added users, it won't be deleted. To do this, the group must be edited in relation to the added users or it must be inactivated.
Searching and Exporting a Group
The groups already registered in Fusion are present on the Groups screen. To search between groups, click on Search:

Then the following screen will appear:

With items for research:
- Type: Group will already be selected, for search among registered groups, the other option is Group with all registered users.
- Code: Enter the group code as a search method.
- Name: Enter the group name as a search method.
- Abbreviaton: Enter the abbreviaton as a research method.
- “Search with exactly the same values”: The search results for fractions of words, if you want the result to return only exact values as entered in one of the fields as a search method, then select this option.
Attention: Just fill in one of the type, code, name or abbreviaton fields so that the search can be performed. You don't have to fill in all fields.
To export groups, select the desired ones and click Export to Excel, the following screen will appear:

The options to export everything registered groups or only selected/Last filtered groups are available.
Clicking Ok will download the file with information about the exported groups.
Creating New User
To enable someone to navigate in Fusion, you need to create a new user. To access the users screen, go to: Administration > Security > Users.
Filling out Basic Settings
To register a user, click New User:

Then you will be redirected to the new user registration screen, in the Profile tab as shown in the following image:

The minimum information for registering a new user is mandatory, in the Profile tab they are:
- User ID: Enter the User ID, which will serve as your login, will also be considered as your code.
- Name: Enter the user's full name.
- New Password: Enter a password meeting the requirements indicated below the field. It can be changed by the user being created or by the system administrator later.
- Confirm password: Confirm the previously filled password by repeating it exactly the same in this field.
Just below the password completion fields will be the password composition requirements that were defined by the System Administrator. These requirements update in real time, so as you fill in the password fields, the requirements that are met are highlighted.
When incorrectly filling in the password, without meeting the minimum conditions and trying to save the outline of the field is colored red and remains so until the change is made and the requirement is met.
Note: Clicking the Eye icon will allow you to hide or display the completed password.
Note: The value entered in the New Password field cannot be the same as the previously registered password.
Tip: If you have questions about the password, access the content available at System > Strong Password Settings to understand the rules behind the minimum password requirements.
Attention: If there is an error resetting/registering the password, you can check the system log to identify what is causing the problem.
These fields are highlighted as shown in the image below:

Afterwards, the organizational settings must be entered, when you click on the Organizational tab, the following screen will be available:

The minimum information to register a new user is mandatory, in the Organizational tab it is necessary to define the group that that user will belong to. The group will define which documents, processes and other functionalities the user will have access to. This field is highlighted as shown in the image below:

When you select this field, all registered groups will appear:

Tip: Add permission settings to new users at creation time so they have access to Fusion functionality. Users without registered permissions only have access to Fusion, without being able to perform any action within the system.
Although it is not mandatory to inform what are the permissions of a user so that it is possible to register a new user, it is interesting to configure this tab, so that when the new user accesses the environment they have the possibility to perform actions within the system, according to their own permissions. When accessing the Permissions tab, the following screen will be available:

Permissions define the user profile, that is, what system roles will be available to them. To configure access profile permissions, expand the Access Profile item, as shown in the following screen:

They will be available to mark access profile options, divided into General Permissions, Documents, Processes, Analytics, as shown in the image below:

When finished, click Save to make effective inclusion of the new user.
Filling in Advanced Settings
In the user's registration, it is possible to insert an image for the user, in addition to the fields to be filled in, which are arranged in several tabs. The completion of these is according to the images presented in sequence: To insert an image for the user, simply click on the editing pencil icon:

Then the photo editing screen will appear. To select a photo, simply click on “Change Photo”:

After selecting the new photo, you can adjust the image by dragging the clipping lines so that only the desired area of the photo is displayed. In View, you can learn how the photo will appear in Fusion. As the picture below:

To discard the photo, simply click on the trash can icon.
When editing is complete, click Save.
In addition to the possibility to change the user's profile image, there are fields to be filled in:
Profile
Where settings for the user's personal and general data are defined.

- User ID: This field is mandatory and must be informed the user's login, which is also considered his/her code. The user ID cannot be modified after registration has been saved at least once.
- Name: It is mandatory to enter the user's full name.
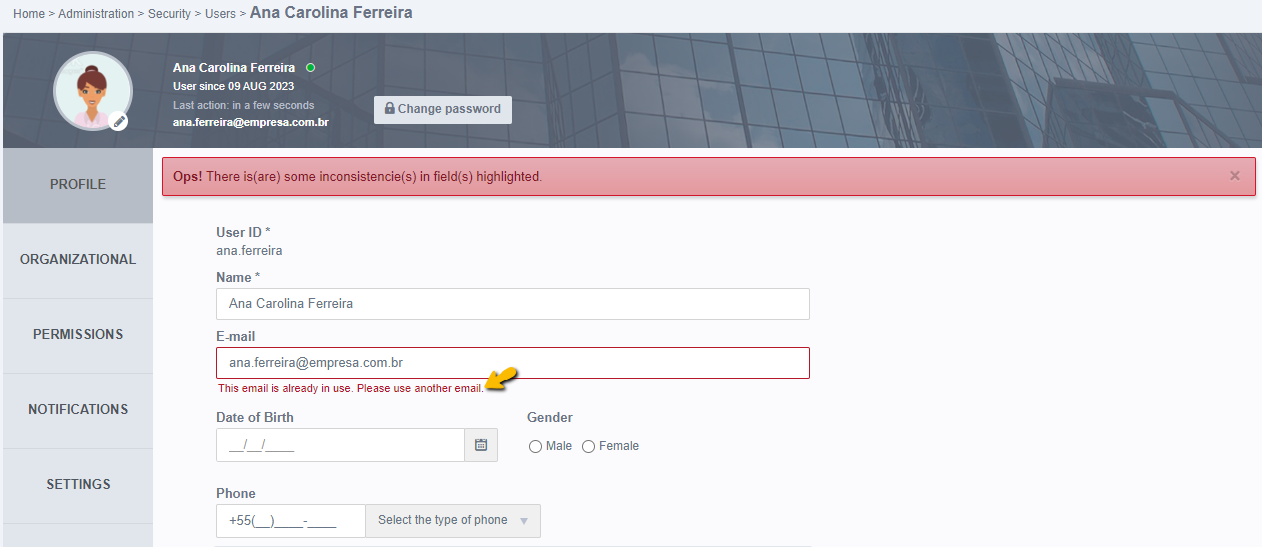
- Email: Enter the E-mail address so that notifications of Fusion jobs are sent via email. In addition, if the user forgets the password and has set up sending email, Fusion helps create a new password by sending a confirmation email.
Attention
From version 3.19.0 or higher, when changing or registering a new email for a user, and the same email is already being used in another account, a validation message will appear on the screen informing that the email address is already in use. Therefore, the user cannot be saved until the email is changed.
Note
In all emails forwarded by Fusion, if the "Subject" field exceeds the limit of 255 characters, it will be forwarded as usual, but it will generate three dots at the end of the subject in the email.
- New Password: Enter a password meeting the requirements indicated below the field. It can be changed by the user being created or by the system administrator later.
- Confirm password: Confirm the previously filled password by repeating it exactly the same in this field.
- Date of Birth: Enter your date of birth.
- Gender: Mark gender.
- Phone: Enter phone numbers in this field. It is possible to register as many numbers as needed through the (+) button, and remove numbers from the (-) button. Next to the phone field it is possible to select its type, as shown in the image below:

- Address: During editing the user profile, you can enter or edit the address. When you click to expand the address settings, the following fields appear:

- Street: Street or street information is mandatory.
- Number: Enter the number.
- Complement: Enter a complement. Example: House or Block A - Apartment 10.
- District: Inform the district.
- Zip Code: It is mandatory to inform the ZIP Code.
- Country: Enter the country.
- State: When selecting the Country, they will be displayed to select only the states that belong to that country.
- City: Selecting the State will be displayed to select only the cities that belong to that state.
When complete, click Save to make the data for all tabs effective. If you want to make more edits, you can do this and save at the end.
Organizational
Fields related to the organization of the institution:

- Company Name: Enter the institution name.
- Position: Enter the position the user has.
- Group: It is mandatory to inform the group that the user belongs to.
- Roles: Roles allow the user to relate to certain competencies performed in the company. To include roles, click on the magnifying glass icon and select the desired roles, as shown in the image below:

- Work Schedule: The user's work schedule is selected, which contains the periods in which the user will be working. To select a work schedule for the user, simply click on the Work Schedule field that it will expand according to the image below:

In the work schedule model, all registered journeys for choice will be available:

Attention: The workshops have an influence on notes of hours in activities of a process.
Note: In Certificates, an item will be automatically displayed when the user digitally signs a document. It's not an editable field.
- Signature: In this area it is possible to insert the user's signature image. This image can be used in the construction of Adapters or also for viewing files. To be able to insert, you need to expand the Signature option by clicking on it, according to the image:

You can drag and drop an image to the specified area, or also click on “Search the image on your computer” to find the image by navigating between the computer's folders. In addition, you can delete or download the image by simply clicking on the image menu, as well as on the next screen:

Attention: The Devices item shows the access logs to the environment on mobile phones or tablets. It's not an editable field.
Permissions
Settings regarding user permissions, users under management, and out of office. In the Permissions tab, there are the Access Profile, Management, and Temporary Absent items:

- Access Profile: The user's profile is defined based on what activities they have access to. When you click to expand the “Access Profile” item, the permissions will be displayed:
They will be available to mark access profile options, divided into General Permissions, Documents, Processes and Analytics, as shown in the image below:
General:
- Option 1: Check to make the user the general administrator of the system. With that, it will have access to all the menu options. Freedom to view, create, edit, and delete system settings and all users, groups, and roles.
- Option 2: Check to make the user the local administrator. With this, he will be able to view, create, edit and delete users, groups and roles that this user is part of and also below.
- Option 3: Check so that the user can access the mobile application according to the permissions received from each module.
Documents:
- Option 1: Check so that the user can administer the module, with permissions to create, edit, delete and configure documents, folders and document types.
- Option 2: Check so that the user can only view, create, edit and delete documents and subfolders, and also the user can view, edit and delete folders.
Note
Users who have permissions in the document module can only view, create, edit and delete folders and subfolders that have permissions configured allowing the user to perform these actions. To better understand the concept of permissions on Folders and Subfolders, and how to make these settings, go to Permissions Tab.
Processes:
- Option 1: Check so that the user can administer the module, with permissions to create, edit, delete and configure processes and forms.
- Option 2: Check so that the user can only view, create and edit process requests.
Analytics:
- Option 1: Check so that the user can administer the module, with permissions to create, edit, delete and configure indicators and reports.
- Option 2: Check so that the user can only view indicator analysis and run reports.
Also, there is another module for which permissions can be released, the Projects module. For the configurations linked to this module to be displayed it is necessary to have a license for it, otherwise it will not appear in your environment.

Having a license, simply access the permissions tab and when creating the user, it will be possible to configure the permissions linked to the Projects module.

- Option 1: Check so that the user can administer the module, with permissions to create, edit, delete, and configure workgroups, projects, permissions, and user restrictions.
- Option 2: Check so that the user can only view the workgroup to which it is associated, create tasks, point out times,
- Management: To make good user management, in order to meet deadlines and achieve goals, it is possible to register users under management so that the manager can view and perform the tasks on behalf of their subordinates. Once registered under management, registered user centers will be displayed in the manager's Task Center. To register a user under management, expand the Management item:

By clicking on the magnifying glass, registered users, roles and groups will be available:

Attention: Only users with a general administrator profile of the system can register users under management, as it is necessary to access the user screen.
- Registering Temporary Absence: In situations where the user needs to be absent from the company, such as: Leaving Vacation or Medical Certificate, the temporary absence registration can be used, where a date or period of absence is provided, a user to assign the functions of the task center of that absent user and the reason for the absence. To register a temporary absence, expand the item “Temporary Absent”:

Attention: It is possible to add future temporary absences, but they will appear in the receiver's task center only on the day of absence or on the start date of the absence period. When this is finished, it will be automatically deleted from the receiver's task center, but in the temporary absence registration of the absent user, it will be marked as “expired”.
To add a new temporary absent, you must click on “New Absence”:

Then it will open a new screen for registration of the temporary absence:

Some fields must be filled in to set up a temporary absence, the first of which is the “Absence Period” which can be set “At” a specific date or “Between” two dates for period of absence:

The date field must then be filled in if it is an absence period of type “At”, or fill in the Date fields for periods of absence of type “Between”. The date can be entered manually or by clicking on the calendar icon, the calendar will be available, to choose the date by clicking on the day, considering that the calendar opens in the current month.

The next field includes the selection of the user, group, or role that will receive their future responsibilities. It is noteworthy that this field is not mandatory, but if it is filled in, during the absence period, the user task center will be available to the selected ones. See how the field of future responsibilities works:

Finally, it is mandatory to provide a reason for temporary absent:

When finished, simply click “Save” and the absence will be recorded.
Notifications
Where are configured the notifications that the new user will receive. Notifications are displayed on the bell icon, located in the upper right corner of the screen, next to the user's image and name. Notifications can be from: Processes, Documents, or Social.

- Processes: It concerns notifications related to Processes.

- Pending Tasks: Check whether you want to receive notifications about pending tasks.
- Available Tasks: Check if you want to receive notifications about new tasks available to take over, available in a pool that you are a participant in.
- Deadline: Check if you want to receive notifications about task situations, such as overdue tasks or tasks in notice.
- Warnings: Check whether you want to receive notifications about processes or tasks that you have involved, such as consensus on approvals, cancellation of processes, among others.
- Documents: It concerns document notifications.

- New Documents: Check if you want to receive notifications about publications or edits of tagged documents on topics you follow.
- Expiration: Check if you want to receive notifications about expired documents posted by you or tagged on topics you follow.
- Controlled Copies: Check whether you want to receive notifications about issuance, inactivation, and expiration of controlled copies generated by you or for yourself.
- Other Actions: Check whether you want to receive notifications about actions taken on documents posted by you or marked on topics you follow.
- Social: It concerns social notifications.

- Comments: Check whether you want to receive notifications about comments and tags associated with you in the feed, document center, or process.
- Likes: Check if you want to receive notifications about likes associated with you in the feed, document center, or process.
Settings
Where the new user interface views are configured.

- Records per table page: Enter a maximum number of search items that will be displayed to the user on the same page. For example: When querying or searching, the results will be displayed on the screen, if 100 results appear, the user can choose to view 10 results per page. This field is not mandatory, but if it is empty, the value 10 will be automatically assigned.
- Search field records: Enter a maximum number of records that will appear in autocomplete when a search is performed. For example, when performing a user search with the letter “A”, the first 10 names with the letter “A” will appear. This field is not mandatory, but if it is empty, the value 10 will be automatically assigned.
- Language: Select the language that Fusion should display.
- Default Desktop: Enter the Fusion URL that should be displayed each time the workspace is accessed. With that, when accessing Fusion, you will be directed directly to the page inserted in this field. For example, entering the Task Center URL
(http://server:port/fusion/appfusion/app/modules/bpm/task/central), when accessing the system or clicking on start, will be forwarded directly to the Task Center itself. - User Downtime: Set the time in minutes that the user can stay without touching the system. After the set time, the user is disconnected from Fusion.
- Allow one task in progress at a time: Inform whether the user can execute only one task at a time in your task center.
- Microsoft Office: Checking this option indicates that Fusion should open documents using Office from the user's machine and when it is not checked, indicates that the documents will be downloaded automatically.
More
Where additional fields are configured for user registration:

- Select the custom form created for user account: If you need to assign new information to the new user, select the custom form to make more fields available in the user's registration.
User Management
The user listing enables better management of each participant. To edit and delete users, access the Users screen, go to: Administration > Security > Users. The user management screen will be available, as shown in the following screen:

According to the previous image, the following are the items:
Ordering Users
A. Ordering: Ordering allows you to change the order of the user listing, when clicking, the options are displayed:
- Groups: Check to have users appear in order of groups
- Name: Check to have users appear in order of names.
- User ID: Check to have users display in order of ID.
- Ascending: Check to have the previously selected user's group, name, or ID appear from A to Z.
- Descending: Check to display the previously selected user's group, name, or ID from Z to A.
Filtering Users
B. Filters: Allows you to display only the desired users. Users who are not in the filter will not appear in the list, and when clicked, the options are displayed:
- Situation: Check this option if you want to filter users by situation by selecting “Active” to filter for active users or “Inactive” to filter for inactive users.
- Group: Check this option if you want to filter users by group, and then choose the desired group or groups.
- Status: Check this option if you want to filter users by Status, selecting “Online” to filter for online users and “Offline” to filter for offline users.
- User Profile: Check this option if you want to filter users by user profile by selecting the Administrator options for each module or Participant for each module.
Note: If you have a license for the Projects module, two additional user profiles appear with which you can filter Project Administrators and Project Participants users.
To have all users appear again, click Clear.
Searching for Users
C. “Search for Users”: Enter the name of the user you are looking for and click on the magnifying glass to perform the search.
Exporting Users to Excel
D. Export to Excel: Click to have the user listing and their data be exported to an Excel spreadsheet. If no user is selected, clicking will display the following screen:

All registered users will be included in the export.
If one or more users are selected, clicking to export will display the following screen:

You will have the option of “Only Selected” if you want only the selected users to have the information exported. If this option was not checked, then all users will be included in the export.
New User
E. New User: Click to create a new user.
User Actions
In each of the users present in the list, a menu is available, on the next screen it is possible to see it expanded:

With the items:
- Select All: Click to select all users displayed in the list.
- Edit: Click to edit user data.
- Change Password: Click to change the user's password.
Clicking Change Password opens a screen allowing you to change the password of the selected user.

Note that when a system administrator is changing another user's password, there is no need to enter the current password.
Note: It is not possible to change the password of multiple users at the same time, i.e. in batch.
- Disconnect: Click to disconnect the user from your session.
- Enable/Inactivate: Click to enable/disable the selected user or users.
When you click Inactivate, the following screen appears:

In Select the new responsible user: select the user who will be responsible for all current and future pending items of the inactivated user. Pending items are tasks in the inbox and documents being edited or approved.
To finish, click Inactivate.
Attention
Remember that, to inactivate a user, the same cannot have temporary absence configured. When inserting a new responsible user and finishing with the inactivation, an error will be displayed informing that the user cannot be inactivated.
Selecting the new responsible user is not a required field to be filled in, because if there are no pending items, there is no need to fill in this field. However, when the user that is being inactivated has pendencies and a new responsible person for these pendencies is not selected, the following error will occur on the inactivation screen:

Attention
The user selected to be responsible for the new assignments of the inactivated user will only receive tasks in his inbox in which the streak has only one participant assigned nominally (by user name) or by form fields, in other words, if the lane participants have been defined by a role or a group, even if this role/group has only one user, the task will not be forwarded to the substitute user.
When entering an inactive user, you can see a warning that the user is inactive and which user is responsible for his pending issues as shown in the following image:

Note
For the user who receives the pending processes (tasks in the inbox or archived from the inactivated user) they will appear as if they have been transferred manually. There will be two indications that the tasks have been transferred by an inactivation process. The first will be in the information about the reason for transferring the activity, all tasks transferred by inactivation (current and future) will arrive at the destination as a transfer made by the System, as shown in the following image:

The other indication will be available after the user sends the process to the next activity and will be in the process history. By clicking on the three dots icon next to the completed task it will be described that the task was transferred by the System due to the inactivation of the user:

- Delete: Click to delete the selected user or users. Clicking will display a confirmation screen, such as the following:

Attention: Only users who do not have relationships with the system can be deleted, that is, who do not have pending open requests, pending tasks, documents in editing, or documents in flows. The user, to be deleted, also cannot be used in forms or tables.
Attention: If the user logs into the system, even if they do not have the aforementioned pending issues, it will not be possible to delete their profile, as the act of login generates registration in the audit center.